Monday, May 21, 2012

New Garage Entry Door

When we bought this house, I knew that the garage door leading to the backyard was in need of replacement.  It no longer closed with grace and there was some signs that it need to be replaced (more on that later).  So, in October when our local Lowe's was closing, we purchased this set of French Doors.  I wanted to have a larger opening than a 32" door going to the backyard.  Since we fenced in our backyard (without gate), I couldn't fit any large items through that door (such as the future riding mower that I want).


These doors have been sitting in the garage for months staring at me every time I parked my car...taunting me to be installed! 


All the while this door has been laughing at me and screeching every time I closed it (literally).  I know what you are thinking, this door doesn't look bad.  And overall it isn't if you consider it better than having just a hole.  But it no longer shut without a significant amount of force.

 The outside looks ok.  The last owners even changed out the brickmold for PVC.  But look in the bottom right...what can't see it?  Take a closer look.

 
OH THE HUMANITY!  That is TERRIBLE.  Or maybe it is secretly hiding money behind there.

The sill was no longer attached there (for obvious reasons) and would just rock back and forth if you stood on it.

 
Alas...nope!  Just rot!  And carpenter ant damage.  I took out the light and switch.  And cut from the inside with my circular saw where the new rough opening is for the french doors.  I removed the PVC.  Wasn't sure if I would be able to reuse them, but I removed them with the idea of being able to save them.  PVC is not cheap!  About $20/board.

 
A closer look at how the rot has wicked up into the OSB, framing, etc...
 
I put my child labor to work inspecting the wood for damage.  They agreed that the wood should be removed.
 
New king stud for rough opening.
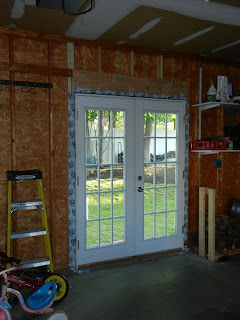
 
Framed out the area with new wood and wrapped in vycor/protecto wrap/ice and water shield.

 
I was, in fact, able to reuse the PVC side trim pieces from the last door ($40 saved).  I had to buy a new top piece.  The new door was actually 2 inches shorter than the old door, so I used a wider piece on the top than on the sides.  
 
Closer look...you can definitely tell old from new.  You can also see my metal flashing above the door.
 
Caulked the cedar clapboards to the trim using Painters' Caulk.
 
I used this kit from EZ-Hang Door ($4.99).  It worked like a charm.  Of course I marked my half inch plumb line before I put on the flashing, so lesson learned!  But still made it easier to make adjustments to get the door square and level.
http://www.ezhangdoor.com/home

Still need to build a ramp to the outside, but that will be a future project.

Breakdown of Cost:
French Door - $250
PVC Trim - $20
Framing - $50
Door Handle with deadbolt - $20
EZ Hang Door Kit - $15 (2 kits plus shipping)
Flashing - $25
Water/Tamper Resistant GFI Outlet (Convert light to outlet) - $20
Caulking/Adhesive - $10


Total - $410

Thursday, May 17, 2012

Before/After Downstairs Bathroom


Tile Spacer - $2.97
(2) Supply Lines - $8.92
12" Floor Tile (60 sq. ft) - $106.20
(5) Fittings (2 I broke) - $50
P-Trap - $19.14
New Hallway Mat (destroyed by Thinset) - $18.97
(3) SpectraLock Grout - $21.18
(3) SpectraLock A/B Mix - $53.94
Paint - $25.17
Thinset - $27.43
Sealant - $17.08
(4) TileBacker - $34.56
Screws for TileBacker - $7.16
Grout Sponges - $8.99
Windleton White Vanity - $422.10
Windleton White Mirror - $69
Light - $80
Tile Saw Blade - $50
Toilet Paper Holder, Towel Holder - $40
Toilet - $229
Plumber - $130 (Install new drain piece on sink)
Painter - $150 (Paint bathroom, ceiling, trim)


Total Cost = $1,571.81

Downstairs Bathroom

We recently redid our downstairs bathroom.  The catalyst for this was the fact that the toilet was requiring 2 flushes.  And also the vanity was leaking (and had been for awhile).

I told my loving wife that if I was going to be replacing the vanity and toilet, might as well do the floor.  And remove the wallpaper (that went behind the toilet).

She agreed because she hates the blandness of every room in the house.

Here are the before pictures.

These are the pictures from during and after wallpaper removal.  Notice all of the spots that the paint came with the wallpaper.  Which means that I would have to fix those with some joint compound.  Pretty much had to skim coat the whole room.


Pictures of Tile Installation and Grouting.  We got very lucky.  We did a dry run and found out our back wall was actually straight.  We were able to use it as our straight edge!  We ended the last row where it was a full size tile...which actually ended up being right at the threshold of the door!


So...my biggest mistake was using a pre-mixed thinset!  Bad move!  It took about a week to dry.  After drying, I grouted with SpectraLock grout (Epoxy based).  Then I covered the floor with plastic and repaired the walls.
Here it is post joint compound.


Of course my little helper. This project couldn't have been completed without him.


He is very good at keeping me on task.  See the expressions of unhappiness and surprise.  He already knows when I am doing something wrong :)


And finally the big reveal!  I am going to post another one after this with a before and after at the same (or close to the same) shot.  Sorry for the duplicate shots.  The ones with the light on more accurately represent the wall color.  The ones with the light off more accurately represent the vanity top color.

The vanity and mirror are Allen + Roth.

Toilet is American Standard Champion 4.