Monday, January 25, 2010

I broke my wookie

So I mentioned how I broke my framing nailer. Not so much that I broke it, but that the cast piece shattered. Oh well...it is now replaced and in it's box as I have been using the DeWalt instead. It is an inch or more smaller so it fits in tighter spaces. Also has depth adjustment.


Anthony and I were able to finish 99% of the framing (all but the armoire/closet). We also finished the electrical. We finished most of the insulation. We installed the furring strips. We framed in a filing cabinet in the hall landing area as well.

At the end of the project, I will lay out what it cost us to finish my son's room as I have been keeping a spreadsheet (like any OCD person would).

Things left to do before drywall:
  1. Armoire/Closet. Need to rebuild the armoire received from Father-in-law including remaking the doors and trimming the entire thing to fit into the space in the room.
  2. Cable/Ethernet/Telephone wires run.
  3. Thermostat wire.
  4. Create Nailer for Bathroom Sink to attach to.
  5. Insulate around chimney and inside bed.

Hopefully I can complete all this upcoming Saturday, but we will see. We did end up working about 6 hours on Saturday because we wanted to complete the above mentioned items.

Tuesday, January 19, 2010

When it comes to knee walls and insulation, there is a lot of controversy over the best way to insulate. Do you insulate just the knee walls and ceiling of floor below and leave a cold zone behind them for air flow and to prevent ice damming.

I don't have the luxury of having your standard knee wall setup as I am using that space for built-in dressers and a built-in bed. So I have insulated the rafters with R21 insulation. But when you pick clothes out of the dresser, the clothes are cold.

I read about the Atticat Blown-In Insulation system and thought it was great because it was less messy than the cellulose hopper type systems.

I figured I needed 5 bags of insulation and I could fill the entire cavity behind the built-in dressers. Not enough to warrant a free blower rental, so I figured we would just deal with some cold clothes :0

But then the friend that is always helping me with my projects bought a house and wanted to increase the R30 that he had in his attic to R60. This would work perfectly because we would be able to complete both insulation projects in 1 day.

That was this past weekend. The Friday before insulation Saturday, we went to Home Depot and bought 20 bags of insulation and rented the machine. If you buy 10 bags or more you get the machine rental for free. So, Saturday morning we start assembling things and getting things ready.

I take my extension cord, plug it into the machine and nothing. The machine won't turn on. Pull out my multimeter and we are getting 120V to the cord. The machine only requires a 15amp circuit, so I know that my 20amp circuit is more than adequate.

We bring it back to Home Depot. The tool rental worker plugs in his cord and VOILA, turns on...

I noticed that he is using a much beefier cord than my 10amp cord. I mention this and he says we can take his rental cord and try it. We get it home, plug in the new cord and voila...works great.

So, make sure you have at least a 15amp cord if you are going to use it on this thing.


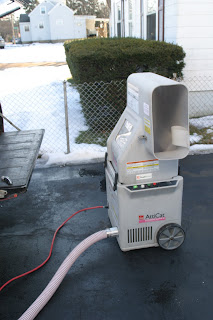
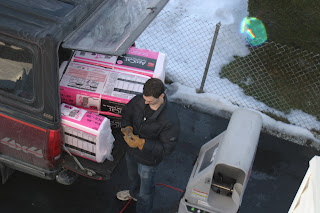
Here is the machine in the driveway and the "helper" that would be feeding the bags into the machine. You cut the bags in half and insert them into the machine. The machine has a razor blade that cuts the bag while you insert it, so that you can pull the bag back out of the machine.

Pretty ingenious and keeps everything in the machine unless you don't hook the hose to firmly on the machine and then you end up having fiberglass blown-in insulation in your driveway...Lesson #2 learned :)


Here is the area being filled in (behind the dressers and the behind the knee wall).


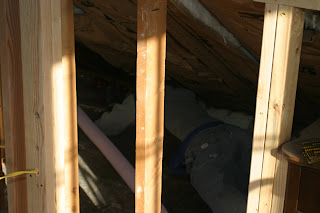
If you look closely you can see me feeding the hose back to the other side of the house. This is where my daughter's completed bedroom is. So, I am filling as best I can the cavities behind her built-in dressers, cave, and bed. I wasn't able to fill every cavity as I couldn't squeeze through the 6" opening, but it is a lot warmer than before and it tightened up the entire upstairs. The clothes are still cool but not cold which is better than before.

I placed fiberglass insulation in the knee wall studs to help keep the blown-in insulation from getting everywhere.


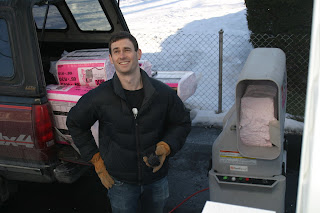
Doesn't Anthony look happy !!

I am very happy with everything. We needed 5.5 bags for my area and Anthony needed 17 bags for his 812 sq. ft of attic space. He had R30 in there before and now has R60. We did have to extend his vent baffles so they wouldn't be filled with insulation. You don't want to cover the only air flow you have from your soffit vents to the ridge vent because you will have an ice damming problem if you didn't already.

Grout

Here are pictures of the grout. Took about 2 hours to complete. I really like the way it turned out.


I am very limited on how often I can work on this. My wife stays home with the 2 children, so of course, she isn't going to want me working on projects all weekend. So I don't work on Sundays. I usually try to put in a half-day on Saturday which means about 4-6 hours of work. This really causes the whole project to take infinitely longer. Not a big deal, just frustrating more than anything else.

We have decided that we are going to pay someone to hang the drywall, tape and mud as they will complete that in a couple of days to a week whereas it would take me quite a few weekends.

The Saturday after grouting, I wanted to complete the framing so I would only have electrical and other minor things to complete before drywalling. Well I had just gone through the 2x4s on hand. I calculated how many I needed and added a few "extras". Well I get home from picking up the 20-2x4s and get working on finishing framing in the bed. I go to nail one of the boards and the cast piece on the front of my framing nailer breaks. This is about 3PM. I call a couple of friends to see if they have a framing nailer and nobody is answering or has one.

At that point, I am frustated and tired so I call it quits and thus haven't completed the framing.

I did pick up another framing nailer on Tooliday.com for a great deal - $120 for a refurbished Dewalt. I also ordered the replacement part for the broken one at a cost of $45 with shipping. So I will have 2 working framing nailers for the future. I will probably end up selling one of them at some point.

I plan on finishing the framing this weekend if all goes well :)

Tuesday, January 5, 2010

Bathroom Tile

We were originally going to go the cheap (read: Free) route and install laminate in the new bathroom floor (leftover from my dad's house). But upon talking with one of the guys at work, he had some leftover tile (Qty:8 12x12 Slate) that he was willing to give to me. He also has a nice tile saw so I wouldn't have to rent it. After showing the Slate to the boss/designer, she agreed wholeheartedly of course. That clinched it. I had to purchase additional tiles as the bathroom is 36" x 64" wide.

I purchased the items we would need on Thursday (New Years Eve) which consisted of:

  1. 2x4s for framing in the door and the wall behind the toilet.
  2. Tile Backer - 1/4" thick because the gap underneath the toilet flange was 1/4" after reinstalling the subfloor and plywood. So, in all I have 1 3/4" of backing before the tile.
  3. Box of 10 additional tiles
  4. Thinset for underneath the tiles and tilebacker.
Well, on New Year's Day. Anthony and I framed the door opening as well as ran some electrical. Still need to pick up a double gang box, but things are progressing.

On Saturday we were supposed to go to a birthday party, but since it decided to snow heavily, the party was cancelled. Lucky for me. I was itching to get the tile installed.

Since the bathroom is so small, I didn't want to just install 12x12 tiles in there. It would look ok because it is slate tile, but still kind of odd with such large tiles. I decided to cut the tile in half (6x12) and lay it out subway style (staggering seams).

I tried to use a snap tile cutter, but since slate is composed of layers, it just broke into pieces. So, I used the tile saw and it worked flawlessly.

I found my center line and worked out from there. It took me about 4 hours to cut and lay all 17 tiles used.


I dried fit each row before laying my thinset and worked a row at a time.


I am nowhere near a professional tiler. I can pass as mediocre (In My Opinion). Since Slate is varying thicknesses, the tiles are not all level. I should have buttered the back of the tile as well as the floor on the thinner tiles. I didn't and so I will have to use the grout as a sort of bevel between the tiles as some of the tiles sit about 1/16" higher than others. I had just enough thinset (literally) to lay the tiles, so I would have run out if I had buttered the back of the low tiles.

Not an excuse by any means, but makes me feel better :0

We picked Mocha for the grout color which is a dark greyish brown color. We will be using SpectraLock Stain Resistant Grout by Laticrete. This is the same grout we used on the downstairs tiles and has held up great.

I like it because it is an epoxy grout. It is a 2-part mixture that you add the color to. It never needs sealing and resists stain. Of course it is more expensive than sanded grout, but I like the fact that it is a true epoxy solution.

More information here:
http://www.laticrete.com/homeowners/products/grouts/stain_resistant.aspx

Since I have done 250 sq.ft before, this will be far easier. You have to make sure you remove all excess off the tiles because once it dries, it is there permanently; especially on a porous surface like Slate. In the kit you buy, they include a 2 cleaning packets that you add to your cleaning buckets. I usually have 3 buckets...1st pass (dirtiest)...2nd pass (1st packet)...3rd pass (2nd packet).